Handy form validation in React Native with react-hook-form useController
Managing forms in React Native is different than in web React. We don’t have shortcuts and HTML to register field through ref. I wanted to create a handy solution that satisfies those requirements:
- easy to understand,
- scalable,
- reusable,
- minor boilerplate,
- hook centric.
After days of experiments, I managed to create a solution that made me satisfied. This article is a summary of my work. I believe this will be helpful to you.
How to use react-hook-form with React Native
I decided to use react-hook-form as it gains more and more popularity and there are good reasons for that.
This article may be considered a forms tutorial in React Native.
You can use the approach presented in the article with formik or other similar packages of your choice. First read through the end and check if your form management package has similar API.
Imports, exports and other miscellaneous code like PropTypes is not included in code snippets to avoid overload. Examples are a simplified version of original files that can be found on git repository attached to this article.
0. Prepare project
I've created new React Native project and prepared it for our example.
npx react-native init ElegantFormManagement
cd ElegantFormManagement
yarn && yarn start
1. Create login form UI without any logic
Let's start with an easy task. We will create the wireframe of our form first. Add src/components directory inside the root of the project.
Now we need two new files Input.js and Login.js :
src
├── components
│   ├── Input.js
│   └── Login.js
Input.js
Input.js is a wrapper for React Native's TextInput component. It has extended functionality to show label above the input field and (if provided) validation error beneath it.
<Label>{label}</Label>
<TextInput />
{isError && <Error>{error}</Error>}
A word about styling components
styled-components will be used in the examples to make components more readable.
yarn add styled-components
Thanks to 'styled-components/native' (notice /native suffix) we can use React Native's components instead of HTML elements. For example styled.View instead of styled.div.
If you are not familiar with this method of styling this is a quick comparison:
const Label = styled.Text`
  color: ${COLORS.gray};
  font-size: 10px;
  letter-spacing: 2px;
`

// will look the same as:
<Text
  style={{
    color: COLORS.gray,
    fontSize: 10,
    letterSpacing: 2,
  }}
></Text>
Input.js code
In the code below you can see that conditional rendering {Boolean(value) && <Something />} is secured by Boolean() function. If you are curious or don't understand why I did that read how conditional rendering in React Native may crash your app.
// src/components/Input.js
import styled from 'styled-components/native'

const Wrapper = styled.View`
  margin-bottom: 15px;
`

const StyledInput = styled.TextInput`
  border-color: ${(props) => (props.isError ? COLORS.red : COLORS.gray)};
  border-width: 1;
`

const Label = styled.Text`
  color: ${COLORS.gray};
  font-size: 10px;
  letter-spacing: 2px;
`

const Error = styled.Text`
  color: ${COLORS.red};
`

export const Input = ({ label, error }) => {
  const isError = Boolean(error)

  return (
    <Wrapper>
      {Boolean(label) && <Label>{label}</Label>}
      <StyledInput isError={isError} />
      {isError && <Error>{error}</Error>}
    </Wrapper>
  )
}
Login.js
Login.js will be our form. For now, it is just mocked component. It consists of two input fields for username & password and a submit button.
// src/components/Login.js

const Login = () => {
  return (
    <View>
      <Input label='Username' />
      <Input label='Password' error="Password can't be blank" />
      <Button title='Login' />
    </View>
  )
}
App.js
App.js is React Native's standard input starting scene. Remove everything from it and just render <Login /> form inside.
// App.js

const App = () => {
  return (
    <View>
      <Login />
    </View>
  )
}
Now our app looks like this:
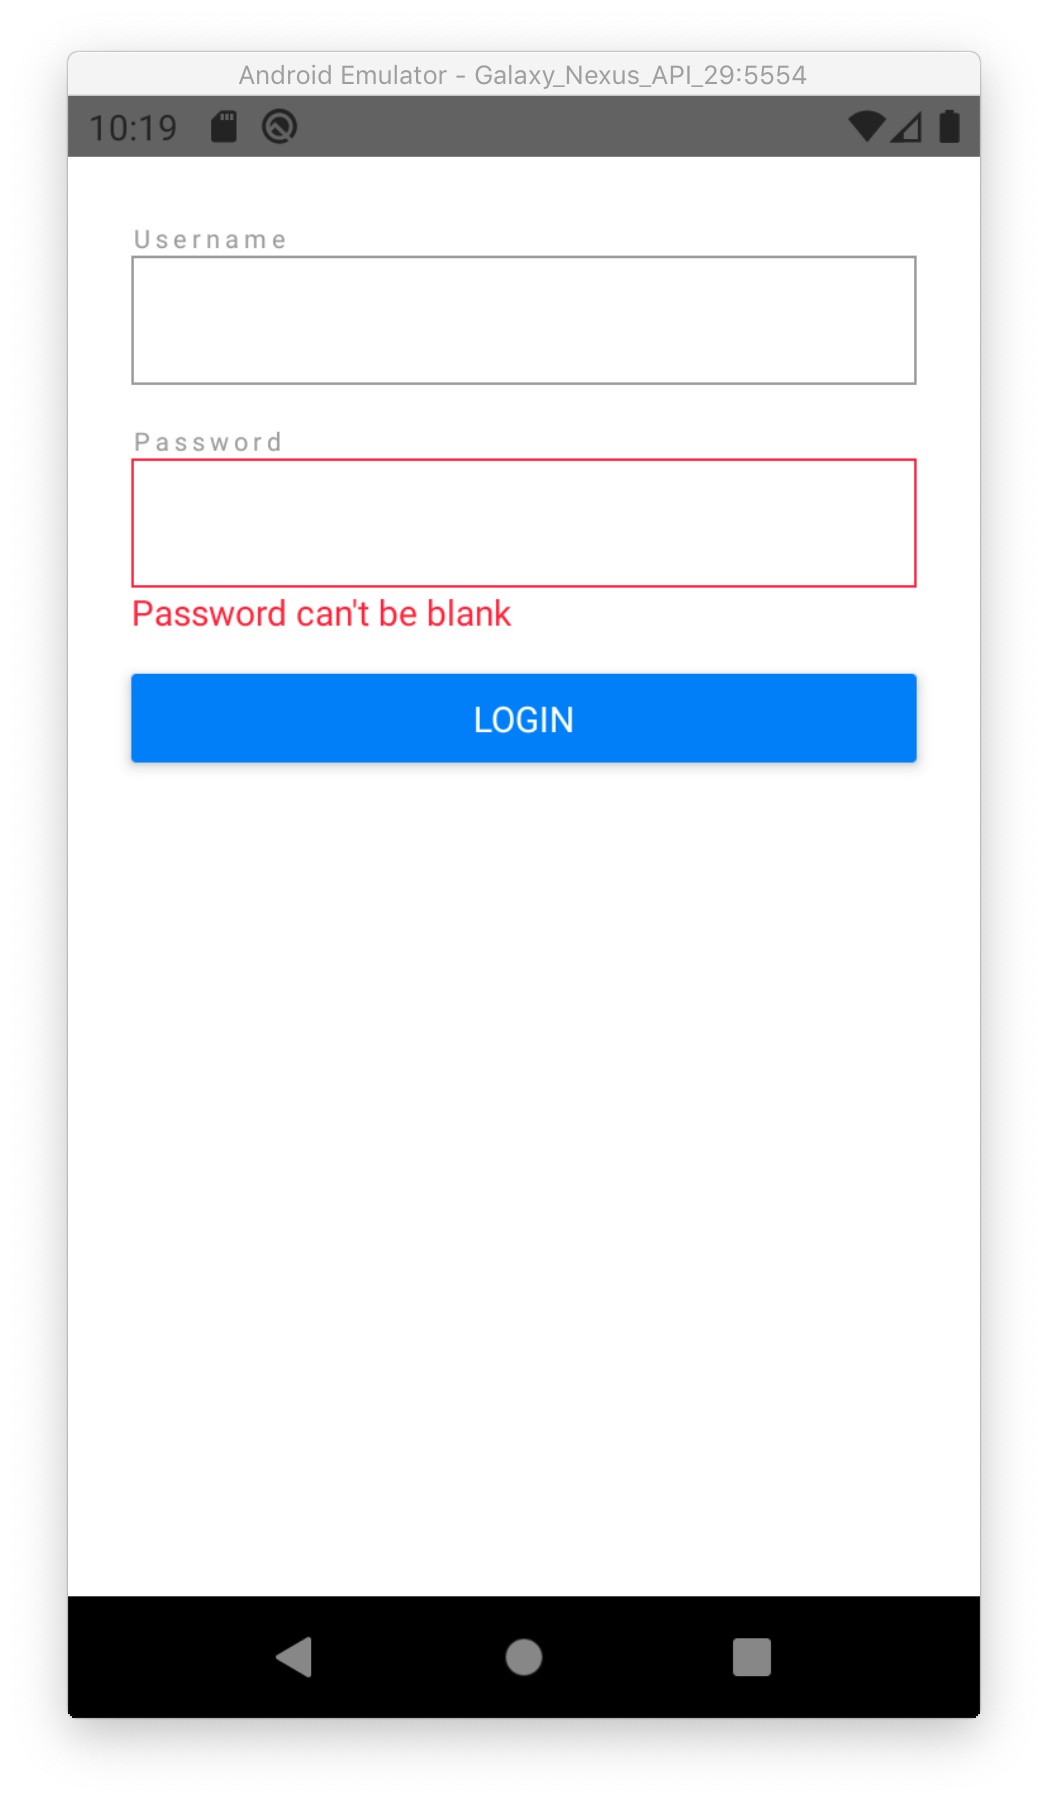
To check full source code on this step visit branch 01-create-basic-ui on git repository.
2. Create a form
The time has come to install react-hook-form package.
Install react-hook-form
Stop your metro bundler and install the package using the following command:
yarn add react-hook-form
Now we are ready to introduce some logic into our UI <Login /> mock.
Import form's brain
Our form will live inside an object returned by useForm() hook. Let's call this object formMethods.
Now import needed hook and add const formMethods = useForm() inside <Login /> component.
// src/components/Login.js
import { useForm } from 'react-hook-form'

const Login = () => {
  const formMethods = useForm()

  return (
    <Wrapper>
      <Input label='Username' />
      <Input label='Password' error="Password can't be blank" />
      <Button title='Login' />
    </Wrapper>
  )
}
Next, we will have to communicate with form fields. To achieve this we will pass formMethods to our Input components.
Full source code: 02-create-form on git repo.
3. Establish communication with form fields
The biggest challenge in an elegant way of making things is to avoid too much "magic". Code needs to be easy to read but also understandable for other programmers. We write code for ourselves and our colleagues and not for the computer. If we would write code for the computer then we should use Assembly or even lower-level language.
React Context is just a little magic touch. It will simplify code and when used with care will not add much complexity to our solution.
What is React Context?
Long story short instead of passing lots of component props we will provide the same information with so-called "context" to component's children. Then each child has access to the context through a hook 🎣.
Add FormProvider to pass form context
I mentioned that our form lives inside formMethods. We have to pass the contents of this object to form fields. In this case, our fields are <Input /> components for username and password.
We put everything that is inside formMethods into context. To do this we have to import <FormProvider /> from react-hook-form. Now we pass everything from formMethods to FormProvider using object spread operator {...formMethods}.
import { FormProvider, useForm } from 'react-hook-form'

const Login = () => {
  const formMethods = useForm()

  return (
    <Wrapper>
      <FormProvider {...formMethods}>
        <Input label='Username' />
        <Input label='Password' error="Password can't be blank" />
      </FormProvider>
      <Button title='Login' />
    </Wrapper>
  )
}
Note that I'm not wrapping Button as a child of the FormProvider. It is a crucial element of our form as pressing it will submit the whole thing. We will interact with a button using good old props so it doesn't have to know everything that happens inside the form.
See branch 03-pass-context-to-fields
4. Add logic to the Input component
Our UI skeleton of <Input /> is not doing anything yet except showing label and error. It doesn't provide props to manipulate <TextInput /> which is inside of it.
Pass props to Input
We will use spread operator again to assign all Input props (except label and error) to object named textInputProps. Next, we have to pass this object to StyledInput which is just a styled version of standard React Native TextInput component.
// src/components/Input.js

export const Input = ({ label, error, ...textInputProps }) => {
  const isError = Boolean(error)

  return (
    <Wrapper>
      {Boolean(label) && <Label>{label}</Label>}
      <StyledInput isError={isError} {...textInputProps} />
      {isError && <Error>{error}</Error>}
    </Wrapper>
  )
}
Create FormInput wrapper
We have a very simple Input component which is easy to test and expand in the future. Keep it this way.
We want to add logic into this component. Instead of adding the logic directly inside Input and tie it with our form management solution, we will create a new component. It will use Input internally and equips it with extra features.
FormInput takes control over Input
FormInput takes a bit different props than Input. For example, it will decide internally about error, and value props of Input so we cannot pass such props to it.
We establish a connection with form headquarters. To achieve this we add useFormContext() hook which returns the object that we've passed through <FormProvider />. As an example, we can read all form errors accessing formContext.errors field.
Take a look:
// src/components/FormInput.js
import { useFormContext } from 'react-hook-form'

export const FormInput = (props) => {
  const { name, rules, defaultValue = '', ...inputProps } = props

  const formContext = useFormContext()
  const { errors } = formContext

  return <Input {...inputProps} error={errors[name]?.message} value={''} />
}
The name prop
It is required for every field in the form to have a unique name. Therefore we pass name prop to every form field. It is an identifier of a field.
Errors object
To show proper error on Input component access errors object from context. Then check whether there is an error message for our field errors[name]. If there are no errors then errors[name] is undefined - therefore we have to be careful. To access error message I use quite a new optional chaining operator (?.).
The
?.operator functions similarly to the.chaining operator, except that instead of causing an error if a reference is nullish (nullorundefined), the expression short-circuits with a return value ofundefined.
If there is an error message then Input will receive it. Otherwise, it will receive undefined.
useController
We have a connection with form so let's use it! Well,... almost.
We will now use our form to store this FormInput's value. First, we have to create our field instance with useController hook. Take a look at the code example below:
// src/components/FormInput.js
import { useController, useFormContext } from 'react-hook-form'

export const FormInput = (props) => {
  const { name, rules, defaultValue = '', ...inputProps } = props

  const formContext = useFormContext()
  const { control, errors } = formContext

  const { field } = useController({ name, control, rules, defaultValue })

  return <Input {...inputProps} error={errors[name]?.message} value={''} />
}
In useController the most important config fields are name as mentioned before and control object. The connection between the field and form is established by providing the control object to the controller.
Keep in mind that control is a central point of the form, this is "the form's brain" I was mentioning before.
To add some restrictions for the field (e.g. maxLength, required) there is rules object. We can also use yup schema or custom resolver function.
field
To keep the value and status of Input we have a field object.
From now on Input is controlled by field object so we pass value and event handlers (onBlur and onChange).
All properties of the field: { onChange, onBlur, value, name, ref }.
// src/components/FormInput.js
import { useController, useFormContext } from 'react-hook-form'

export const FormInput = (props) => {
  const { name, rules, defaultValue = '', ...inputProps } = props

  const formContext = useFormContext()
  const { control, errors } = formContext

  const { field } = useController({ name, control, rules, defaultValue })

  return (
    <Input
      {...inputProps}
      error={errors[name]?.message}
      onChangeText={field.onChange}
      onBlur={field.onBlur}
      value={field.value}
    />
  )
}
Notice that on Input component we use onChangeText prop to get string instead of event from input field: onChangeText={field.onChange}.
Login
Change Input components to FormInput inside our main form view: Login.js.
I've also removed error prop from password Input as this is no longer demo view — it almost works!
LOGIN_FIELDS
Forms can grow with time so it is wise to keep all constants in variables. I've created LOGIN_FIELDS const for field names. It prevents from making typos and searching for a minor bug for hours in the future.
// src/components/Login.js

const LOGIN_FIELDS = {
  username: 'username',
  password: 'password',
}

const Login = () => {
  const formMethods = useForm()

  return (
    <Wrapper>
      <FormProvider {...formMethods}>
        <FormInput name={LOGIN_FIELDS.username} label='Username' />
        <FormInput name={LOGIN_FIELDS.password} label='Password' />
      </FormProvider>
      <Button title='Login' />
    </Wrapper>
  )
}
Right now our form stores values and react to changes. Fields are connected with central formMethods object but we lack any validation and submitting. Let's dive into it in the next section.
To see full source check branch 04-create-form-input on a git repository.
5. Validate & submit
To send data from a form we have to take care of the login button.
Create two handlers:
onSubmitwhich takes a whole form as an argument when it is valid,onErrorswhich will handle errors in the form.
Now we pass handleSubmit function from formMethods to onPress prop of our button. handleSubmit function takes two callbacks as arguments — onSubmit and onError.
// src/components/Login.js

const Login = () => {
  const formMethods = useForm()

  const onSubmit = (form) => {
    console.log(form)
  }

  const onErrors = (errors) => {
    console.warn(errors)
  }

  return (
    <Wrapper>
      <FormProvider {...formMethods}>
        <FormInput name={LOGIN_FIELDS.username} label='Username' />
        <FormInput name={LOGIN_FIELDS.password} label='Password' />
      </FormProvider>
      <Button
        title='Login'
        onPress={formMethods.handleSubmit(onSubmit, onErrors)}
      />
    </Wrapper>
  )
}
No rules
There are no rules so the form is always valid! At this point every button press will call onSubmit. onErrors is ignored. We have to add some restrictions for username and password.
Pass rules object as prop to FormInput. Notice that more complex rules as minLength are represented by an object and simple rule like required can be just represented by a string with an error message. To understand how rules works see react-hook-form docs.
At this point we could use yup schema instead of rules. Schemas are much more powerful in terms of form validation. I will not cover this here to not overcomplicate this article. If you're interested let me know in the comments! I can prepare "part 2" of adventures of the forms.
// src/components/Login.js

const Login = () => {
  const formMethods = useForm()

  const onSubmit = (form) => {
    console.log(form)
  }

  const onErrors = (errors) => {
    console.warn(errors)
  }

  return (
    <Wrapper>
      <FormProvider {...formMethods}>
        <FormInput
          name={LOGIN_FIELDS.username}
          label='Username'
          rules={{ required: 'Username is required!' }}
        />
        <FormInput
          name={LOGIN_FIELDS.password}
          label='Password'
          rules={{
            required: 'Password is required!',
            minLength: {
              message: 'Use at least 10 characters.',
              value: 10,
            },
          }}
        />
      </FormProvider>
      <Button
        title='Login'
        onPress={formMethods.handleSubmit(onSubmit, onErrors)}
      />
    </Wrapper>
  )
}
We have handled a very basic scenario of the login form. Now let's take a look at what we can improve in this simple solution.
To check full source code at this point check 05-submit-form branch on git repo.
6. Make every form field error-proof
We mentioned before that form field requires name and form context. To achieve this we pass name through prop and we take context from useFormContext hook.
The assumption that the author of the code and every developer in the team will always pass proper prop and wrap our form in FormProvider is too optimistic. We have to make code error-proof.
It would be nice to give a proper message for the developer that something is forgotten. Unless we'd like to show our users one of those errors:
-
TypeError: Cannot read property 'split' of undefinedhappens when you forget to pass name prop, -
TypeError: Cannot read property 'control' of nullpops up when a field is not wrapped inFormProvider.
We could simply try to apply conditional rendering here like this:
//	... Don't do this:
const formContext = useFormContext()
if (!formContext || !name) {
  return null
}
const { field } = useController({ name, control, rules, defaultValue })
//  ...
But it would break React rule to not call hooks conditionally and if you have properly configured ESLint you'd see such error:
React Hook "useController" is called conditionally. React Hooks must be called in the exact same order in every component render. Did you accidentally call a React Hook after an early return?
Another wrapper
This might not seem so pretty at first glance but it makes things done:
- it keeps hooks call order always the same,
- makes the wrapped component safe.
In the code snippet below I renamed old FormInput component to ControlledInput and removed export from it to make it "private". This prevents importing of ControlledInput in other files in the project.
Next, I've created a new "public" component - the wrapper. Now this one is called FormInput and is exported from the file. Logic inside the wrapper is straight forward. It checks whether formContext or name is falsy and if this is the case wrapper returns <Input /> with a proper error message. I also block editing on those fields to make sure that integration tests fail.
Adding error messages makes it easier to debug when something goes wrong in the future. Thanks to this your automatic tests or QA team will detect instantly that something is wrong.
// src/components/FormInput.js

// "private" component - created from old "FormInput"
const ControlledInput = (props) => {
  const { name, rules, defaultValue = '', ...inputProps } = props

  const formContext = useFormContext()
  const { control, errors } = formContext

  const { field } = useController({ name, control, rules, defaultValue })

  return (
    <Input
      {...inputProps}
      error={errors[name]?.message}
      onChangeText={field.onChange}
      onBlur={field.onBlur}
      value={field.value}
    />
  )
}

// wrapper - our new FormInput
export const FormInput = (props) => {
  const { name, ...inputProps } = props
  const formContext = useFormContext()

  if (!formContext || !name) {
    const errorMessage = !name
      ? 'Form field must have a "name" prop!'
      : 'Form field must be a descendant of `FormProvider` as it uses `useFormContext`!'
    return <Input {...inputProps} error={errorMessage} editable={false} />
  }

  return <ControlledInput {...props} />
}
To see full source of FormInput.js at this point check branch 06-error-proof-fields.
What's next?
With FormInput.js base you can similarly build other form fields like: FormChecbox, FormTextArea etc.
I could add more content here like:
- use yup schemas,
- describe how to focus password field from the keyboard,
- how to pass
reftoFormInput, - create a custom hook for shared form field logic,
- how to test form...
My first draft for this article contained all those things but it started to be overloaded! I can use it next time if you'd like to read it. Let me know!